Valentine Butter Cookies with Icing
Highlighted under: Favorite Baking Collection
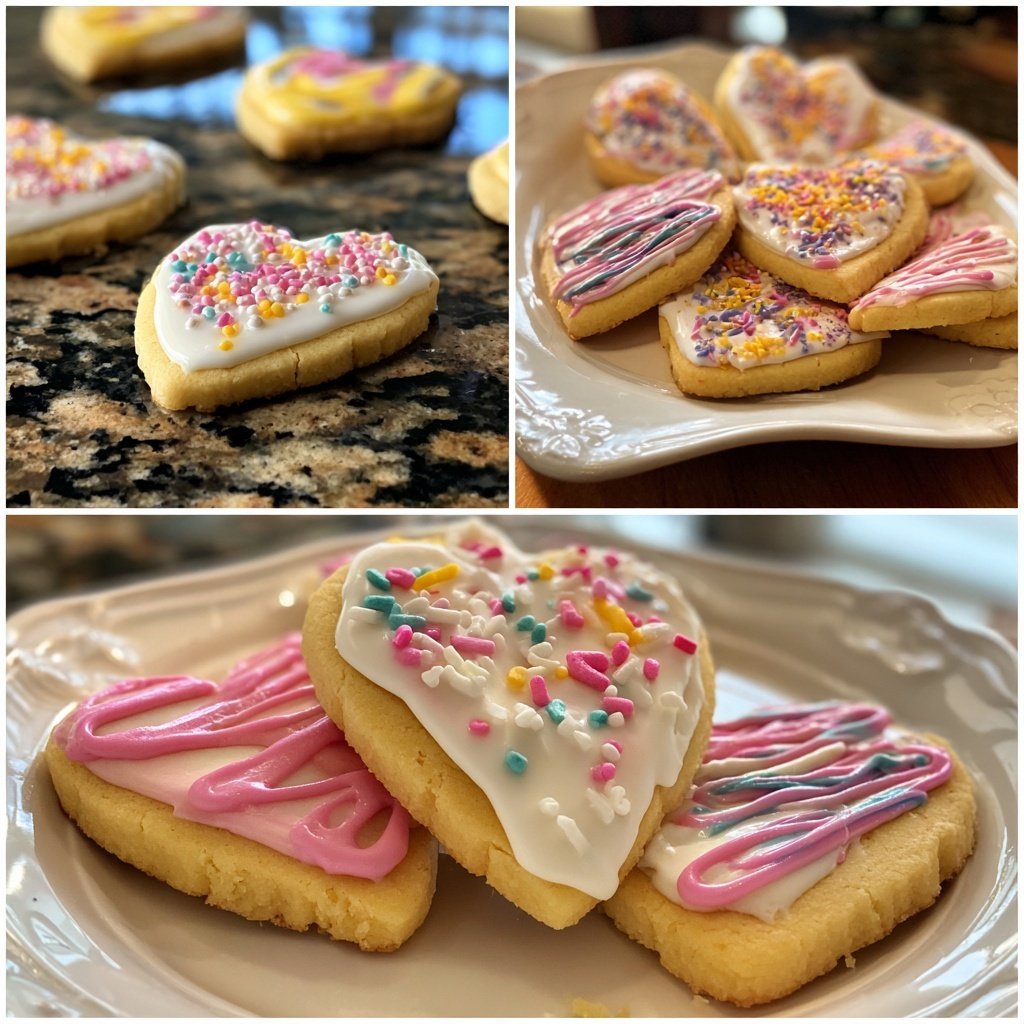
I love baking, especially when it comes to making Valentine Butter Cookies with Icing. These delightful treats are perfect for expressing affection and sharing with loved ones. The buttery flavor paired with the sweet icing makes them irresistible. I've perfected this recipe over the years, and I can assure you that the combination of simple ingredients yields a spectacular result. With just a little creativity in decorating, these cookies can bring a smile to anyone's face on Valentine’s Day.
When I first set out to create these butter cookies, I wanted to capture the essence of Valentine’s Day in a bite. The rich, buttery dough melts in your mouth, and the icing adds a sweet touch that feels like a warm hug. I’ve experimented with several ratios before landing on the perfect balance of ingredients that results in a soft yet slightly crisp cookie.
To make decorating easier, I recommend using a piping bag for the icing. It allows for more control, making it simpler to create beautiful designs. Trust me, once you see how lovely these cookies look, you’ll want to share them with everyone you know!
You'll Love These Butter Cookies Because
- They are buttery and melt-in-your-mouth delicious.
- The colorful icing adds a fun and festive touch.
- Perfect for gifting or sharing with your Valentine!
The Importance of Butter in Cookies
Butter is the star ingredient in these Valentine Butter Cookies, providing the rich, creamy flavor that makes them melt in your mouth. Using unsalted butter allows you to control the amount of salt in the final product. Make sure your butter is softened to room temperature; this ensures it creams well with the powdered sugar, which is crucial for achieving that light and fluffy texture. If you're short on time, you can cut your butter into small cubes and microwave it for just a few seconds—be cautious not to melt it, as that will change the cookie's texture.
The ratio of butter to flour also affects the cookies' finished texture. Too much flour can lead to dry cookies, so I recommend measuring your flour accurately by spooning it into the measuring cup and leveling it off with a knife. If you prefer a slightly firmer cookie, you can reduce the amount of butter to 3/4 cup, but be aware that this will change the overall flavor and texture.
Icing Tips for Beautiful Designs
When preparing the icing, achieving the right consistency is key for decorating. A thicker icing will hold its shape, making it ideal for outlines, while a thinner icing can be used for flooding the cookies for a smooth finish. If your icing is too runny, add a bit more powdered sugar; if it's too stiff, add water very gradually to avoid making it too thin. I've found that using a balloon whisk can help achieve a great whipping texture for the egg whites, creating a light and airy base for the icing.
Consider flavoring your icing with extracts like almond or lemon for an extra twist. When using food coloring, gel colors offer vibrant hues without adding excess liquid, which can affect the icing's structure. Experiment with different designs and layering techniques for a variety of looks. You can also sprinkle edible glitter or nonpareils on top of the wet icing for an added festive touch.
Ingredients
For the Cookies
- 2 cups all-purpose flour
- 1 cup unsalted butter, softened
- 3/4 cup powdered sugar
- 1 large egg
- 1 teaspoon vanilla extract
- 1/2 teaspoon baking powder
- 1/4 teaspoon salt
For the Icing
- 1 egg white
- 2 cups powdered sugar
- 1-2 tablespoons water
- Food coloring (optional)
Make sure to have all the ingredients at room temperature for best results.
Instructions
Prepare the Dough
In a large mixing bowl, cream together the softened butter and powdered sugar until light and fluffy. Add the egg and vanilla extract, mixing until combined. In a separate bowl, whisk together the flour, baking powder, and salt. Gradually add the dry ingredients to the wet mixture, mixing until just combined. Wrap dough in plastic wrap and refrigerate for 20 minutes.
Bake the Cookies
Preheat your oven to 350°F (175°C) and line a baking sheet with parchment paper. Roll the dough out on a floured surface to about 1/4 inch thickness. Cut into desired shapes and place them on the prepared baking sheet. Bake for 10-12 minutes or until the edges are lightly golden. Allow cookies to cool completely before icing.
Make the Icing
In a mixing bowl, whip the egg white until frothy. Gradually add the powdered sugar and mix until smooth. Add water, one tablespoon at a time, until you reach the desired consistency. If using food coloring, divide the icing into bowls and mix in the colors. Transfer icing to a piping bag.
Decorate the Cookies
Once the cookies are completely cool, use the piping bag to decorate them with icing. Get creative with designs and let the icing set for about 30 minutes before serving.
Store any leftover cookies in an airtight container to maintain freshness.
Pro Tips
- For an extra touch, consider adding sprinkles or edible glitter on top of the icing before it dries.
Make-Ahead Suggestions
These butter cookies are excellent for making ahead of time. You can prepare the dough, wrap it tightly in plastic wrap, and refrigerate it for up to three days before rolling and baking. Alternatively, the dough can be frozen for up to two months. Just ensure you thaw it in the refrigerator overnight before use for the best results when rolling it out.
Once baked, the cookies can be stored in an airtight container at room temperature for up to a week. If you want to keep them fresher for longer, consider freezing the baked cookies without icing. They can be stored in a freezer-safe container for up to three months, retaining their delicious buttery flavor.
Serving and Gifting Ideas
These Valentine Butter Cookies make wonderful gifts, especially when packaged in a decorative box or wrapped in cellophane tied with a ribbon. They are perfect for sharing with friends, family, or colleagues, creating a thoughtful, handmade gift that meets the spirit of Valentine's Day. You can also include a little note expressing affection to make it even more special.
These cookies are not just a Valentine's treat; they can be customized for other occasions too. Simply change the food coloring and shapes of the cookies to match themes for birthdays, holidays, or anniversaries. By using various icing techniques, each batch can have a fresh look, ensuring every occasion feels unique and festive.
Questions About Recipes
→ How can I store the cookies?
Keep the cookies in an airtight container at room temperature for up to a week.
→ Can I use margarine instead of butter?
Yes, but this may change the flavor and texture slightly. For best results, use unsalted butter.
→ What if my icing is too thick?
Add a small amount of water, one teaspoon at a time, until it reaches your desired consistency.
→ Can I freeze the cookies?
Yes, you can freeze the cookies before icing. Just make sure they are fully cooled, then place them in a freezer-safe container.

Valentine Butter Cookies with Icing
Created by: Juliet Ashford
Recipe Type: Favorite Baking Collection
Skill Level: Intermediate
Final Quantity: 24 cookies
What You'll Need
For the Cookies
- 2 cups all-purpose flour
- 1 cup unsalted butter, softened
- 3/4 cup powdered sugar
- 1 large egg
- 1 teaspoon vanilla extract
- 1/2 teaspoon baking powder
- 1/4 teaspoon salt
For the Icing
- 1 egg white
- 2 cups powdered sugar
- 1-2 tablespoons water
- Food coloring (optional)
How-To Steps
In a large mixing bowl, cream together the softened butter and powdered sugar until light and fluffy. Add the egg and vanilla extract, mixing until combined. In a separate bowl, whisk together the flour, baking powder, and salt. Gradually add the dry ingredients to the wet mixture, mixing until just combined. Wrap dough in plastic wrap and refrigerate for 20 minutes.
Preheat your oven to 350°F (175°C) and line a baking sheet with parchment paper. Roll the dough out on a floured surface to about 1/4 inch thickness. Cut into desired shapes and place them on the prepared baking sheet. Bake for 10-12 minutes or until the edges are lightly golden. Allow cookies to cool completely before icing.
In a mixing bowl, whip the egg white until frothy. Gradually add the powdered sugar and mix until smooth. Add water, one tablespoon at a time, until you reach the desired consistency. If using food coloring, divide the icing into bowls and mix in the colors. Transfer icing to a piping bag.
Once the cookies are completely cool, use the piping bag to decorate them with icing. Get creative with designs and let the icing set for about 30 minutes before serving.
Extra Tips
- For an extra touch, consider adding sprinkles or edible glitter on top of the icing before it dries.
Nutritional Breakdown (Per Serving)
- Calories: 150 kcal
- Total Fat: 7g
- Saturated Fat: 4g
- Cholesterol: 20mg
- Sodium: 45mg
- Total Carbohydrates: 22g
- Dietary Fiber: 0g
- Sugars: 9g
- Protein: 2g